



How to Use a Meat Thermometer (Complete Guide)
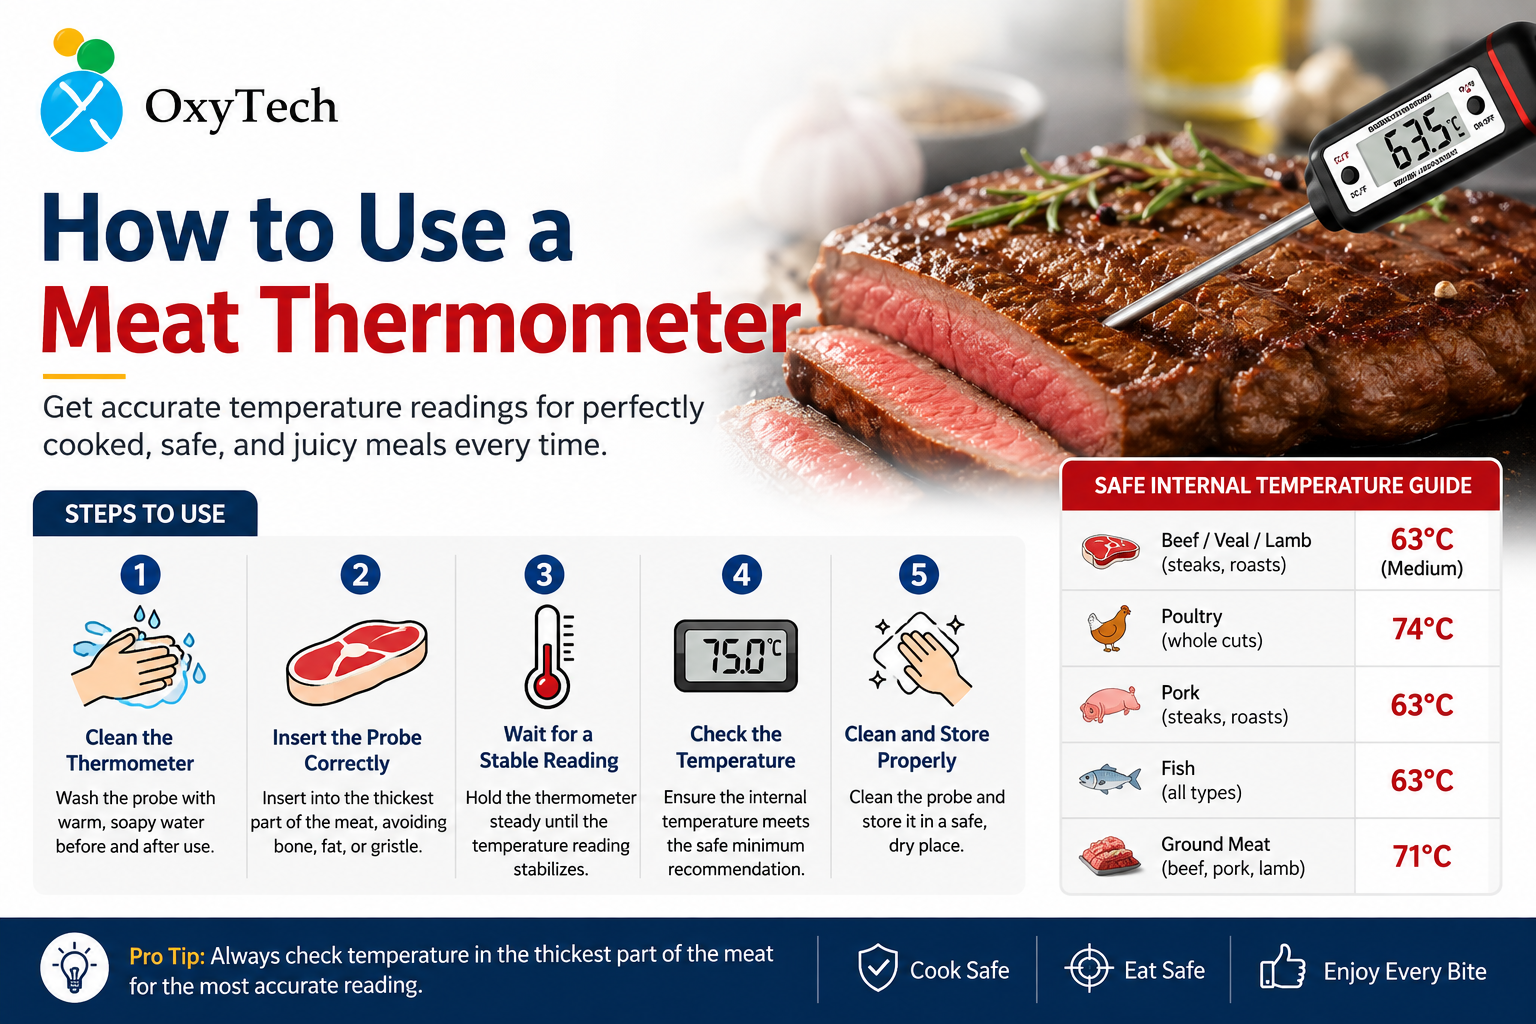
Quick answer: Insert the probe into the thickest part of the meat, away from bone, fat, and gristle, and wait for the reading to stabilize (about 2–20 seconds depending on the thermometer type). For thin foods like burgers and chops, insert the probe sideways so the tip reaches the center. Compare the reading to the USDA safe minimum: 145°F for whole cuts of beef, pork, lamb, and veal (plus a 3-minute rest), 160°F for ground meat and egg dishes, and 165°F for all poultry, leftovers, and casseroles.
Color, texture, and cooking time are not reliable ways to tell if meat is safe to eat. The outside of a piece of meat can look fully cooked while the center is still under temperature — or the reverse, meat can be safe to eat before it looks "done" by appearance. A food thermometer is the only tool that removes the guesswork, and using one correctly is a five-minute skill.
This guide covers which thermometer to use, exactly where to place the probe for every major cut, how long to wait for an accurate reading, the full USDA safe-temperature chart, how to calibrate and clean your thermometer, and the mistakes that most often throw off a reading.
Why a Thermometer Beats Guesswork
Most foodborne bacteria are destroyed somewhere between 140°F and 165°F, depending on the food. That's a narrow enough window that eyeballing it isn't good enough — but it's precise enough that a thermometer accurate to within a couple of degrees is all you need to hit it reliably every time.
A thermometer helps you:
- Confirm meat has reached a safe internal temperature before serving
- Avoid undercooked poultry, ground meat, or egg dishes
- Prevent overcooking and dried-out texture
- Hit your preferred doneness on steaks and roasts consistently
- Check multiple spots on a large or irregular roast, where the center can lag well behind the surface
- Get reliable results on an unfamiliar grill, smoker, or oven
It's most valuable on thick or irregular cuts, boneless roasts, stuffed dishes, and anything cooked on equipment you don't use every day.
Choosing the Right Thermometer
The right type depends on how fast you need a reading and whether it needs to survive the cooking environment.
Instant-read digital thermometer
Gives a reading in roughly 2–10 seconds. Best for steaks, chops, chicken breasts, burgers, fish fillets, and smaller roasts. Meant to go in briefly near the end of cooking — not left in an oven or on a grill unless the packaging specifically says it's oven-safe.
Leave-in (probe) thermometer
Stays in the food for the whole cook, either with a wired display or a wireless connection to a receiver or phone. Good for turkey, whole chicken, brisket, pork shoulder, large roasts, and anything smoked low and slow. Confirm the probe and cable are rated for your appliance's temperature range before leaving it in.
Oven-safe dial thermometer
Can stay in a roast the entire time it cooks, with a large face readable through the oven door. Dial thermometers respond more slowly than digital ones — often 15–20 seconds to settle — so they suit thick cuts and large roasts better than thin, fast-cooking foods.
Thermocouple thermometer
The fastest type, often producing a stable reading in 2–5 seconds thanks to a very thin sensing tip. That thin tip also makes it well suited to thin cuts — cutlets, fish fillets, patties — where a bulkier probe might not fully sit inside the food. The entire sensing area has to be surrounded by meat, or the reading won't reflect the true internal temperature.
Step-by-Step: How to Use a Meat Thermometer
- Check the manufacturer's instructions first. Probe depth, calibration method, oven/grill safety, and battery requirements vary by model.
- Turn it on and set the unit (°F or °C). An oddly high or low reading before the probe even touches food is a sign it needs calibration or a battery change.
- Find the thickest part of the meat. This is the last part to reach a safe temperature and the spot most likely to still be underdone.
- Insert the probe into the center of that section, keeping the tip away from bone, fat, gristle, the pan, and the grill grate. For steaks, chops, and chicken breasts, going in from the side often lands more accurately in the center than going in from the top.
- For thin foods — burgers, sausage patties, thin fillets — insert the probe horizontally from the side so the tip reaches the middle rather than stopping near the surface.
- Wait for the reading to fully stabilize. Thermocouples settle in seconds; dial thermometers can take 15–20 seconds. Don't read the first number that appears — it can still be climbing.
- Check more than one spot on large or uneven cuts — a whole turkey, a big roast, a bone-in ham. Use the lowest reading as your decision point.
- Compare against the USDA safe minimum for that food (chart below).
- Clean the probe with hot, soapy water before it touches anything else, especially before using it on food that's already cooked.
Where to Place the Probe, by Food
Steaks and pork chops — Insert from the side into the thickest point, clear of bone and fat. On a bone-in chop, aim for the thickest meaty area next to — not touching — the bone.
Burgers, sausage patties, and meatballs — Go in horizontally from the side so the tip reaches the true center. Inserting from the top on a thin patty often leaves the sensing area too close to the surface, giving a falsely high reading. Because bacteria in ground meat can be distributed throughout the product (not just the surface), the center reading is what matters.
Chicken breasts, thighs, and legs — Insert into the thickest part from the side, avoiding bone, which conducts heat differently than the surrounding meat and can skew the reading.
Whole turkey or chicken — Check the innermost thigh, the thickest part of the breast, and the innermost wing. If it's stuffed, check the center of the stuffing too — it also needs to reach 165°F.
Beef, pork, lamb, and veal roasts — Center of the thickest section, away from large fat pockets and bone. On a bone-in roast, position the tip beside the bone, not touching it.
Fish and shellfish — Thickest part of the fillet or whole fish; go in from the side on thin cuts. Don't rely on flaking or opacity — check the temperature.
Ham — Thickest portion, avoiding the bone; check more than one spot on a large ham since temperature can vary across it. Fresh or smoked uncooked ham should reach 145°F with a 3-minute rest. Fully cooked ham from a USDA-inspected plant only needs reheating to 140°F; other fully cooked ham should reach 165°F — follow the package label.
Sausage links — Insert a narrow probe from the end or side, keeping as much of the sensing area inside the sausage as possible.
Egg dishes and casseroles — Insert into the thickest or most solid part of the dish; both should reach 160°F (egg dishes) or 165°F (casseroles) before serving.
Safe Internal Temperature Chart (USDA)
| Food | Minimum internal temperature | Rest time |
|---|---|---|
| Beef, pork, lamb, veal — steaks, chops, roasts | 145°F (62.8°C) | At least 3 minutes |
| Ground beef, pork, lamb, veal | 160°F (71.1°C) | None specified |
| Chicken and turkey, whole or ground | 165°F (73.9°C) | None specified |
| Fish and shellfish | 145°F (62.8°C) | None specified |
| Egg dishes | 160°F (71.1°C) | None specified |
| Fresh or uncooked ham | 145°F (62.8°C) | At least 3 minutes |
| Leftovers and casseroles | 165°F (73.9°C) | None specified |
These are minimums for safety, not necessarily your preferred serving temperature — for whole cuts of beef especially, personal doneness preference (rare through well-done) sits on top of this baseline, and going lower than 145°F is a food-safety trade-off, not just a taste choice.
By Cooking Method
Oven: For an instant-read thermometer, start checking a few minutes before the recipe's estimated finish time — pull the pan out briefly to test. A leave-in probe goes in before the food enters the oven.
Grill: Move food off direct flame before testing if you can, to avoid touching the probe to a hot grate. Insert from the side on steaks, chops, and burgers, and check more than one piece if the grill has hot and cool zones.
Stovetop: Pull the pan off the burner (or lower the heat) before testing, and keep the probe off the pan's surface — a hot skillet can read hotter than the food itself and throw off the result.
Smoker: A leave-in probe is the easiest option for long cooks. On large cuts like brisket or pork shoulder, use more than one probe or check several spots, since different sections can cook at different rates.
Air fryer: Open the basket to check the thickest piece, keeping the probe off the basket or heating element.
How to Calibrate a Meat Thermometer
Ice-water method:
- Fill a glass with crushed ice, top with cold water, and stir.
- Insert the probe at least 2 inches deep, away from the sides and bottom of the glass.
- Wait for the reading to stabilize — it should read 32°F (0°C).
Boiling-water method:
- Bring clean water to a full boil.
- Insert the probe without touching the pan.
- At sea level, it should read 212°F (100°C) — expect a lower reading at higher altitudes.
Digital thermometers usually need a reset or replacement if they're off; some dial models have an adjustable calibration nut under the face.
Common Mistakes
- Measuring the surface instead of the center — the outside cooks first and reads hotter than the true internal temperature
- Letting the tip touch bone, the pan, or the grill grate — you'll read the surface or the bone, not the meat
- Inserting a thin patty from the top — often stops short of the center; go in from the side instead
- Checking only one spot on a large roast — uneven cuts need multiple readings; trust the lowest one
- Testing too late — start a few minutes before the recipe's expected finish time, not after
- Skipping cleaning between raw and cooked food — wash with hot, soapy water every time
- Trusting color over temperature — meat can look pink and be safe, or look brown and be underdone
Cleaning Your Thermometer
- Wash your hands after handling raw meat.
- Wash the probe in hot, soapy water and rinse well.
- Sanitize if the manufacturer allows it.
- Dry with a clean towel and store somewhere protected.
- Don't submerge the whole unit unless it's specifically rated fully waterproof — most digital models are water-resistant at the probe only.
Frequently Asked Questions
Should I leave a meat thermometer in while cooking? Only if it's designed for it — a leave-in or oven-safe probe, yes; a standard instant-read thermometer, no.
Do you insert a meat thermometer before or after cooking? Instant-read: near the end, briefly. Leave-in: before cooking starts.
How deep should a meat thermometer go? Deep enough that the sensing area sits at the center of the food — depth varies by model, so check the manufacturer's guidance.
Where do you put a thermometer in a burger? Sideways, into the center of the thickest part. Ground beef needs 160°F.
Can I use a meat thermometer for oil or candy? Only if it's rated for high heat — standard meat thermometers can be damaged by deep-frying temperatures.
Why does my thermometer show different readings in different spots? Bone, fat, uneven thickness, and hot spots in your oven or grill all affect how fast different areas cook. Check multiple spots and go with the lowest.
Should meat rest after cooking? Yes — whole cuts of beef, pork, lamb, and veal should rest at least 3 minutes after hitting 145°F. Resting redistributes juices and lets the temperature even out; it can also rise a few degrees further during the rest (carryover cooking), though poultry and ground meat should already be at their full safe temperature before you pull them off heat.
Final Checklist
- Probe went into the thickest part
- Avoided bone, fat, gristle, pan, and grill grate
- Thin foods measured from the side
- Waited for the reading to fully stabilize
- Checked multiple spots on large or uneven cuts
- Compared against the correct USDA minimum
- Cleaned the probe after contact with raw meat
- Rested whole cuts the appropriate amount of time
A thermometer removes the guesswork from cooking: find the center of the thickest part, keep the tip away from anything that distorts the reading, and check it against the chart above. Do that consistently and meat comes out safe, properly cooked, and consistent every time.